Users: Adding Employees (For Administrators)
The Users section (Users) is designed for managing your organization’s team. Here you can add new employees, assign roles to them, and manage access to system functions.
Important: this section is available only to users with the Administrator role.
How To Open The Users Section
- In the sidebar, open the
Userssection. - A page with the list of employees in your organization will open.
User list Page Interface
The page consists of a toolbar, a filters area, and the main users table.

Toolbar
| Action | Purpose |
|---|---|
| Create | Adds a new user. |
| Delete selected records | Deletes one or more selected users. |
| Hide / Show filters | Shows or hides the advanced search panel. |
| Reset filters | Clears all applied filtering conditions. |
| Select all / Clear selection | Selects or clears all users on the page. |
| Refresh data | Refreshes the data in the users table. |
Users Table
The main table usually contains the following columns:
- User name / Email.
- Organization name.
- Roles, meaning assigned user roles such as
admin,recruiter, orsenior recruiter. - Created / Last changed.
For quick search, you can use filters by user name or email.
How To Add A New Employee
Step 1. Start The Addition Process
Click Create in the toolbar.
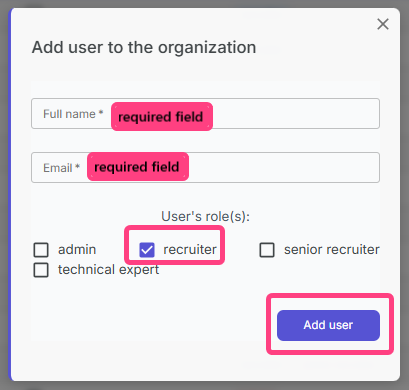
Step 2. Fill In The Form
The system will open the Add user to organization window.
Fill in the required fields:
- Full name, meaning the employee’s first and last name.
- Email, meaning the employee’s work email.
Step 3. Assign Roles
In the User roles section, assign one or more roles.
| Role | Purpose |
|---|---|
| ADMIN | Full access to all sections, including organization settings and user management. |
| SENIOR | Extended permissions, including access to knowledge matrices and templates. |
| EXPERT | Access to technical expertise and assessments. |
| RECRUITER | Basic access for conducting interviews and reviewing results. |
For a regular recruiter, the recruiter role is usually sufficient.
Step 4. Send The Invitation
- Check the entered data.
- Click Add user.
- The system will close the window and add the employee to the users list.
- An invitation will automatically be sent to the specified email.
User Search
To quickly find an employee, use the search field by name or email.
What The New Employee Receives
An email with the subject Invite to RECRUITER.AI is sent to the specified address.
Email contents:
Subject: Invitation to the RECRUITER.AI platform
Hello, [Employee Name]!
You have been invited to the RECRUITER.AI platform, and an account has been created for you automatically.
Login: [Employee Email]
To start using the account, confirm your email address and set a new password.
[Button: Confirm email and set password]
Best regards,
RECRUITER.AI Team
Employee’s Next Steps
- Click the email confirmation button.
- Set a password for signing in to the system.
- After that, sign in using the email and the password that was set.
At this point, the administrator’s task is complete.